Collections
What are Content Collections?
Content Collections are the best way to get your content out to an even larger group of supporters who may not all be Reach users on your campaign. Each collection gets a publicly accessible web page with a customizable URL which allows visitors to view and share your content without downloading any apps or creating any accounts. You can customize the brand colors, banner image, header text, ordering of the assets, and even an open block of fully formatted body text which you can use to provide visitors with context or instructions for the collection.
Visitors can then browse the content in the collection along with your suggested script copy, download it, and share it directly to Facebook, X, BlueSky, Instagram, TikTok, and Threads. They can share from their computer if they’re logged in to those social networks, or they can scan a QR code for a given piece of content in the collection to share it from their phone.
Content Collections pages are designed for both desktop and mobile browsers and are optimized for lightning-fast load times. Each Collection may contain up to 100 assets from your Reach Content Library including images, videos, and links. Keep in mind that Collections are not directly visible to your users in the app, so you’ll want to still use Galleries and Labels to bundle up content for use in the app.
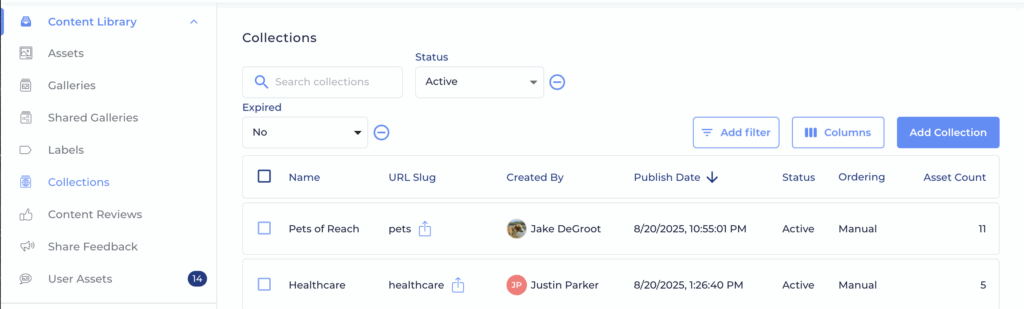
The Collections Admin Screen
The Collections admin screen is where you make and manage Content Collections. The main screen is a list view of your Collections which can be filtered and sorted. When you want to start adding assets to a Collection, you’ll want to come here first to make a Collection to put them in.
Note that Reach Basics campaigns can not make Collections and Reach Complete campaigns can make only one.
Adding and Editing Collections
To create a Collection, click “Add Collection” in the top right, name your Collection and set everything up just how you want it. Each section of the form is explained in more detail below.
URL Slug
Based on the name you enter, Reach will automatically generate a suggested “URL Slug” which determines the URL of your public collection page. You can customize this URL to whatever you’d like it to be, but it cannot be the same as the URL of another collection in your campaign. Your URL slug will identify this collection in links and the browser address bar like https://collections.reach.vote/{campaign name}/{slug}. Be careful when changing your slug because any links previously shared to your collection will no longer work.
Text in the Collection
There are three bits of text you can customize on each Collection page: the name, the header text, and the body text. Only the name is required.
The name is displayed prominently at the top of the page.
The header text is displayed directly under the name in the header and is intended to provide a brief explanation of the collection or call to action. It can be a maximum of 150 characters. The header text will also be used in link previews when links to Collections are shared in other apps.
The body is a great way to provide visitors with more in-depth context, instructions, or guidance as they view the Collection. You can add rich text including advanced formatting like lists, bold, italics, links, in-line images, tables, and more. You can use markdown or the Reach editor to set this body text up just as you’d like it. Keep in mind that body text will always display above the assets in the collection, so visitors will have to scroll past the body text to get to the assets.
Banner Image and Brand Color
You can customize the look of your collection by adding a banner image and specifying a brand color. The banner image will display prominently at the top of your collection and be used as the preview image when a link to the collection is shared in other apps. We do not recommend including text in the image as it may be partially covered on different screens sizes or as users scroll. The brand color will be used for buttons, outlines, header background and more. A lighter version of the color will be used as well.
Asset Ordering
In most cases, the assets at the top of the your Collection will get the most attention, so Reach gives you full control over how your Assets will be sorted for visitors. Manual ordering will display assets as you arrange them on the assets tab using drag and drop. Random ordering will display assets in a different random order on every page load to rotate which assets get the most attention. You may also choose to order by the date the assets were originally uploaded to Reach, the date they were last updated, or the date they were added to the collection, all with the newest at the top.
When using any ordering besides Manual, you can pin assets if you want to override their natural sort position and show them at the top of the page. Within the pinned assets, you can always drag and drop to arrange them as you like. The fact that an asset is pinned in your collection will not be apparent to visitors. You can pin an asset by clicking the “…” in the bottom right of the asset card and choosing “Pin”.
Publication and Expiration Dates
Each Collection may optionally have a publication date and/or an expiration date. This is a date and timestamp. The Collection will not become available until the publication date. Once the expiration date has passed, the Collection will no longer be shown to users. This is helpful when you’re adding Collections which are only applicable or relevant for a certain amount of time.
Public Listing of Collections
While all published Collections are publicly accessible for anyone with the link, publicly listed Collections may show up in search engine results. You can choose whether or not to make your Collection publicly listed under “Visibility”.
Adding and Arranging Assets
Once you have created your collection, click on the “Assets” tab to add assets to it from your Content Library. This will open the Asset Browser in the drawer on the right side of your screen. Simply drag assets from the drawer into the Collection. Click the “Show Filters” bar in the Asset Browser to expand a filtering section so you can find the assets you want to add.

If you’ve opted for Manual ordering, you can arrange Assets in whatever order you choose by dragging and dropping within the main asset tab.
Keep in mind that just like in the app, if an asset is inactive or expired, it can be added to your collection but it will not be visible on the public Collection page.
If you want to remove an asset from your collection, click the “…” button in the bottom right of the asset’s card and choose “Remove”.
Sharing Your Collection
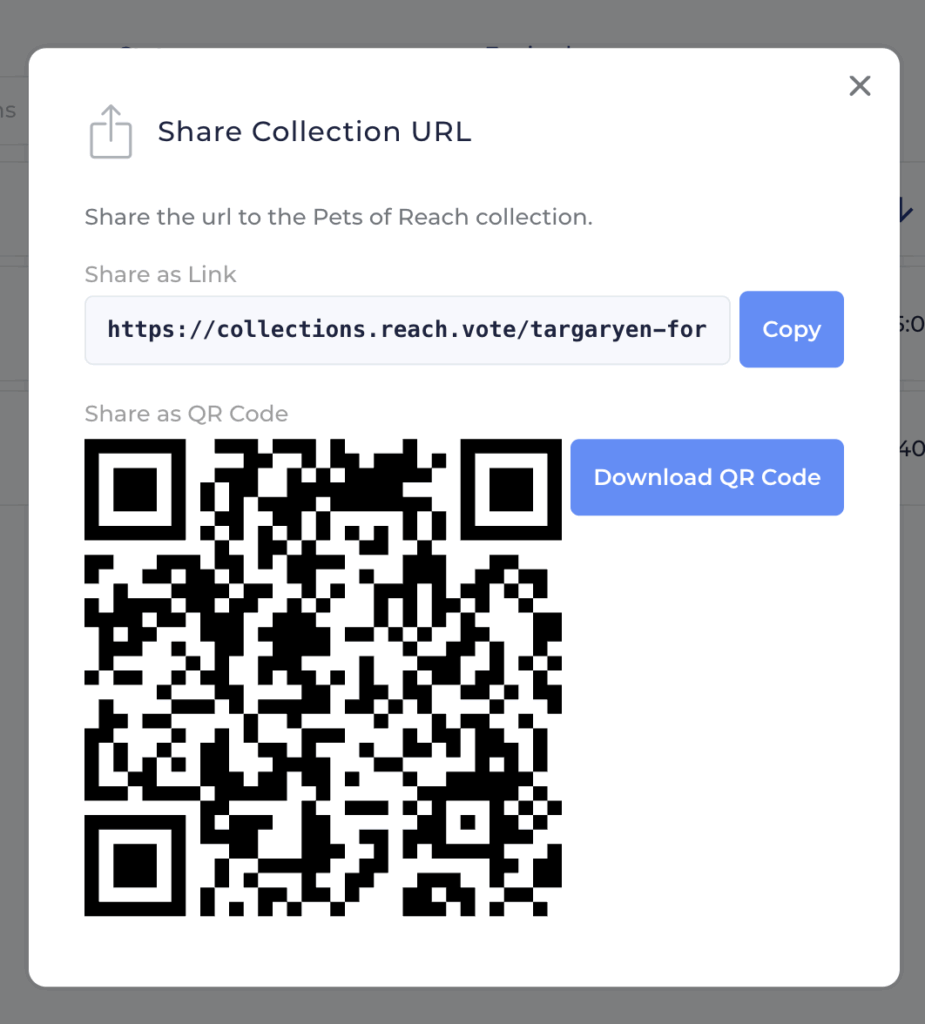
Once your Collection is created, click the share icon next to the URL Slug on the edit form or the main Collections list. You’ll get a pop-up with the URL to copy and a QR code you can download. Share the URL with your supporters and they can then browse and share your content directly from there. Custom domains for your Content Collection are also available upon request.
Data from Content Collections
Data about downloads and shares via your Collections will be included in all your existing Reach data flows like Admin Dashboard graphs, CSV exports and BigQuery Mirrors. Because visitors to a public Content Collection page are not logged into Reach, downloads and shares from collection visitors will not include a User ID.