Search by keyword
Network Screen
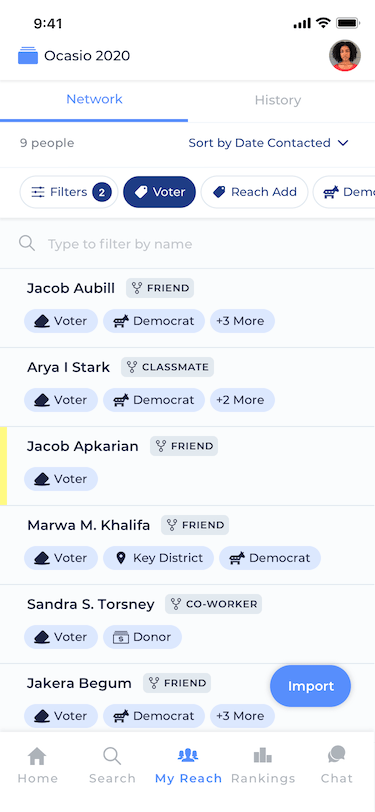
When you want to dive deeper than just browsing your Reach history and seeing all the voters you’ve reached, it’s time to turn to the My Network feature. This feature can be enabled or disabled by a campaign admin or owner so if you’re not seeing it on your campaign, ask the admins!
Viewing your Relationships
The My Network feature is found on the first tab of the My Reach screen. It will list everyone you have added a relationship with so you can organize your crew. Any time you visit the profile screen of someone in your Network, you will also see your relationship with them indicated right after their name.
Filtering and Sorting
The Network Screen can be filtered and sorted to give you the most helpful view of your network. At the top of the screen, you’ll find a Quick Filter bar that lets you filter the list by any set of tags or relationship types. You’ll also find a sort button that lets you sort the list by Name, Relationship, Date Added to Network, or Date Last Reached by you.
Adding New Relationships
Any Reach user can add a relationship with any person in Reach. There is no limit as to the number of users who can have a relationship with a given person. There are three ways to add a relationship with a person in Reach:
By importing your contacts or other Reach campaigns
You can import your phone contacts and Google Contacts into Reach to build out your Network. You can also import contacts from other Reach campaigns you have worked on. For a detailed walkthrough of importing your contacts, check out the Contact Import Knowledge Base article.
From the person’s profile screen
Tap the “Add to My Network” button right below their name and select from a list of relationships to add them to your network.
As you’re adding a new person to Reach:
If you’re adding a brand new person to Reach, you can add them to your network right as you go! Just scroll down to the “Relationship” section and tap “Add to My Network”. Then, when you confirm their information and add them to Reach, they will already be in your network.
Default Relationship Types
When you’re adding someone to your Network, you’ll be able to choose from the following universal relationship types:
- Acquaintance
- Classmate
- Coworker
- Faith Community
- Family
- Fellow Member
- Fellow Organizer
- Friend
- Friend of Friend
- Met while organizing
- Neighbor
- Other
- Recruit
- Self
- Significant Other
- Social Groups
- Social Media Follower
Removing Relationships
Breaking up is hard to do, but removing a relationship in Reach is a piece of cake! Just tap on them to navigate to their Person Screen and tap the pencil icon next to the Relationship under their name. Then in the menu that pops up, tap the option to remove the person from your Network.
Changing Relationship Types
Did you add someone as a Friend when they’re really your family? No problem. Just follow the same instructions above to tap into the person and tap the Pencil icon next to their Relationship under their name, then select “Change Relationship Type” from the menu that pops up.


